Metrology : Is this the world’s most accurate CMM?
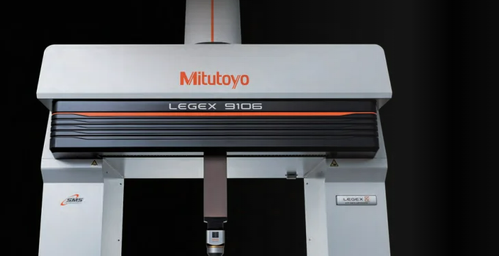
Many iconic thresholds have fallen over the years: climbing Mount Everest; running the four-minute mile; landing on the Moon; breaking the sound barrier in a land vehicle. In engineering terms, attaining true sub-micron measurement from a bridge-type CMM (co-ordinate measuring machine) has represented the promised land for some time. With the launch of its LEGEX Takumi CMM, Mitutoyo claims to be the world’s first under this seemingly impossible bar.
“Mitutoyo developed the LEGEX Takumi because customers are constantly pushing the boundaries of accuracy,” states Chris Pullen, Regional Sales Manager at Mitutoyo UK. “The machine will be of interest to industries that include automotive, aerospace, precision tool manufacture, medical and defence. The LEGEX Takumi is by far most accurate CMM we offer. Regarding the wider market, we don’t know of a more accurate machine in its class.”
Crunching the numbers
Any claim of this nature of course requires the numbers to back it up. In the measurement world, there are two important figures when scrutinising the precision of CMM technology: the first-term accuracy statement and, to help nurture greater comprehension in real-world terms, the worst uncertainty when measuring a standard 1m length.
The first-term accuracy statement of the Mitutoyo LEGEX Takumi is 0.23+0.7L/1000µm (at 19-21°C using Mitutoyo’s high-precision MPP310Q scanning probe). That’s less than a quarter of a micron!
“There are other CMMs that boast a sub-micron first-term accuracy statement, including our existing LEGEX at 0.28+L/1000µm,” admits Chris Pullen. “However, true sub-micron measurement demands a real-world conversion to provide better understanding, and it involves measuring a product of 1m in length.”
The worst uncertainty when using a LEGEX Takumi CMM to measure a feature or product 1m long is 0.93µm. In other words, true sub-micron measurement. It compares with 1.28µm for the existing LEGEX model, a 26% improvement.
“The micron is a long-held threshold for CMM measurement and we’re the first under it. We don’t believe any of our competitors in this class of machine are sub-micron. You might think that 1.28 to 0.93µm is negligible over a 1m distance, but in the measurement world it’s quite significant.”
Crafting the future
So, how has Mitutoyo managed to deliver this notable industry advance? There’s a clue in the CMM’s name, Takumi, which in Japanese means artisan – the highest pinnacle of craftsmanship.
According to Mitutoyo, when tracing a flat surface, only an artisan can feel the slightest imperfection and hone it to an axis straightness and perpendicularity that is difficult to attain by machine. The company’s master artisans use ultra-high precision lapping and hand finishing techniques to ensure higher production accuracy and stability in the body of LEGEX Takumi CMMs. The company also deploys FEM (finite element method) for advanced structural analysis to ensure high rigidity and damping performance.
Another major contributor to delivering true sub-micron measurement is Mitutoyo’s ethos of manufacturing all core components in-house, including the crystallised glass scales. Deployed in all three axes of the LEGEX Takumi, the glass scales offer 0.01μm resolution and virtually zero thermal expansion (0.01×10⁻⁶/K coefficient of expansion). Further key features in the pursuit of ultra-accurate measurement include the machine’s fixed bridge structure (the table moves rather than the bridge), precision air bearings, and highly rigid guideways to ensure motion stability and ultra-high geometrical accuracy. The LEGEX Takumi comes as standard with an anti-vibration stand.
“The anti-vibration stand allows users to get the best performance from their LEGEX Takumi,” states Chris Pullen. “0.23µm is less than the size of a small bacteria. External noise [vibration] can influence such a high-accuracy machine, so a sound standalone anti-vibration stand is essential when considering a machine of this class.”
Probing for precision
Other factors promoting Mitutoyo’s new-found accuracy levels include the probe system. Mitutoyo has delivered an accuracy improvement in its MPP310Q scanning probe and mounting adapter. The enhancements mean improved squareness/roundness during ring gauge scanning measurement, from 0.40µm with previous-generation MPP to 0.17µm with the upgraded probe.
“Our ultra-high precision MPP-310Q scanning probe is unique to Mitutoyo. This multi-functional probe not only performs continuous path contact-type scanning measurements at up to 120 mm/s but also high-accuracy point measurements. You can of course use probes from other manufacturers with the LEGEX Takumi, but the first-term accuracy statement will not be as good.”
Mitutoyo offers four models in its LEGEX Takumi range, extending from 500 x 700 x 450mm to 900 x 1000 x 600mm in capacity.
“We’ve only just released the machine and already have a strong stream of ongoing enquiries from UK customers in sectors such as aerospace, semiconductor and analytical instruments,” reports Chris Pullen. “With equipment like this, potential customers want to undertake repeatability studies; bring their products along to ensure the machine can do what it claims. We anticipate the first sales shortly.”
Today, the world’s standards are changing and it seems CMM technology and its sub-micron capability is taking on a whole new dimension.
Go with the plan
CMM program generation using standard CADCAM-based programming packages can often take hours or even days. Mitutoyo says its MiCAT Planner software offer a better way, automating the entire CAD-based CMM programming process by using geometric dimensioning and tolerancing (GD&T) and part geometry contained within the model-based definition (MBD).
MiCAT Planner software enables more flexible measurement by complying to customisable measuring rules set by the operator. Depending on the feature type, size and other criteria, the user sets the number of measuring points, their distribution and probe speed. It’s possible to apply several sets of rules simultaneously according to manufacturing or customer requirements. Importantly, the software establishes consistent measurement guidelines to eliminate any variations that may occur between multiple CMM programmers.
“Once the operator creates the rules, the software applies them to the CAD model information,” explains Richard Lunn, CMM Sales Specialist at Mitutoyo UK. “With just a few clicks the user can then create an entire program, enjoying a reduction in programming time of around 93% if all the PMI [product and manufacturing information] is present. However, if some or all of the PMI is missing the operator can add it to the model, with MiCAT Planner creating the measuring path on this basis. In such instances programming time will still reduce by around 55%.”
To provide a further productivity boost, MiCAT Planner’s integrated path-and-probe optimisation function automatically selects the shortest measurement path with the fewest probe changes to measure the part as quickly as possible.

